Continuing our remote webinar series, this week we're going to focus on essential steps for Remote Solar Design. For all of us working remotely, this article will take you through the key steps of remote solar design. If you'd like to take a look at the design used for this article, you can access it here. We will cover techniques and considerations for the following:
- Sourcing Imagery
- Importing & Sizing Overlays
- Shade Based Height Estimation
- Conservative Design
- Shading Analysis
- Production Guarantees
- Using Templates for Design
Sourcing Imagery
Why it matters: When designing remotely, you want to make sure that your designs are not only attractive, but they have accurate dimensions and actually consider all the elements of the roof. Nobody wants to be surprised by getting to a site only to find that the rooftop was different than what they designed for.
How to do it: Imagery can be sourced from any number of sites. High quality free options include Google Earth, Google Maps, Bing Maps, and other similar mapping solutions.
That said, there are a number of ways to purchase imagery as well, with companies such as Nearmap and EagleView providing high quality low-flying aerial imagery for a price.
If purchasing imagery isn't the right fit for you, you can also take your own overhead photos of the site with a drone, or you can use site plans for buildings that haven't been constructed yet to begin your design.
Importing & Sizing Overlays
Why it matters: Once you have the correct imagery, you also want to make sure it's the right size and orientation. A roof only has so much space, and you probably want to use most of it. Be sure of how much space you have by taking the time to get measurements exact.
How to do it: Draw a known dimension (like the side of a roof, or a nearby obstruction) to give yourself something to size off of. Then match that same dimension in the overlay you're uploading.
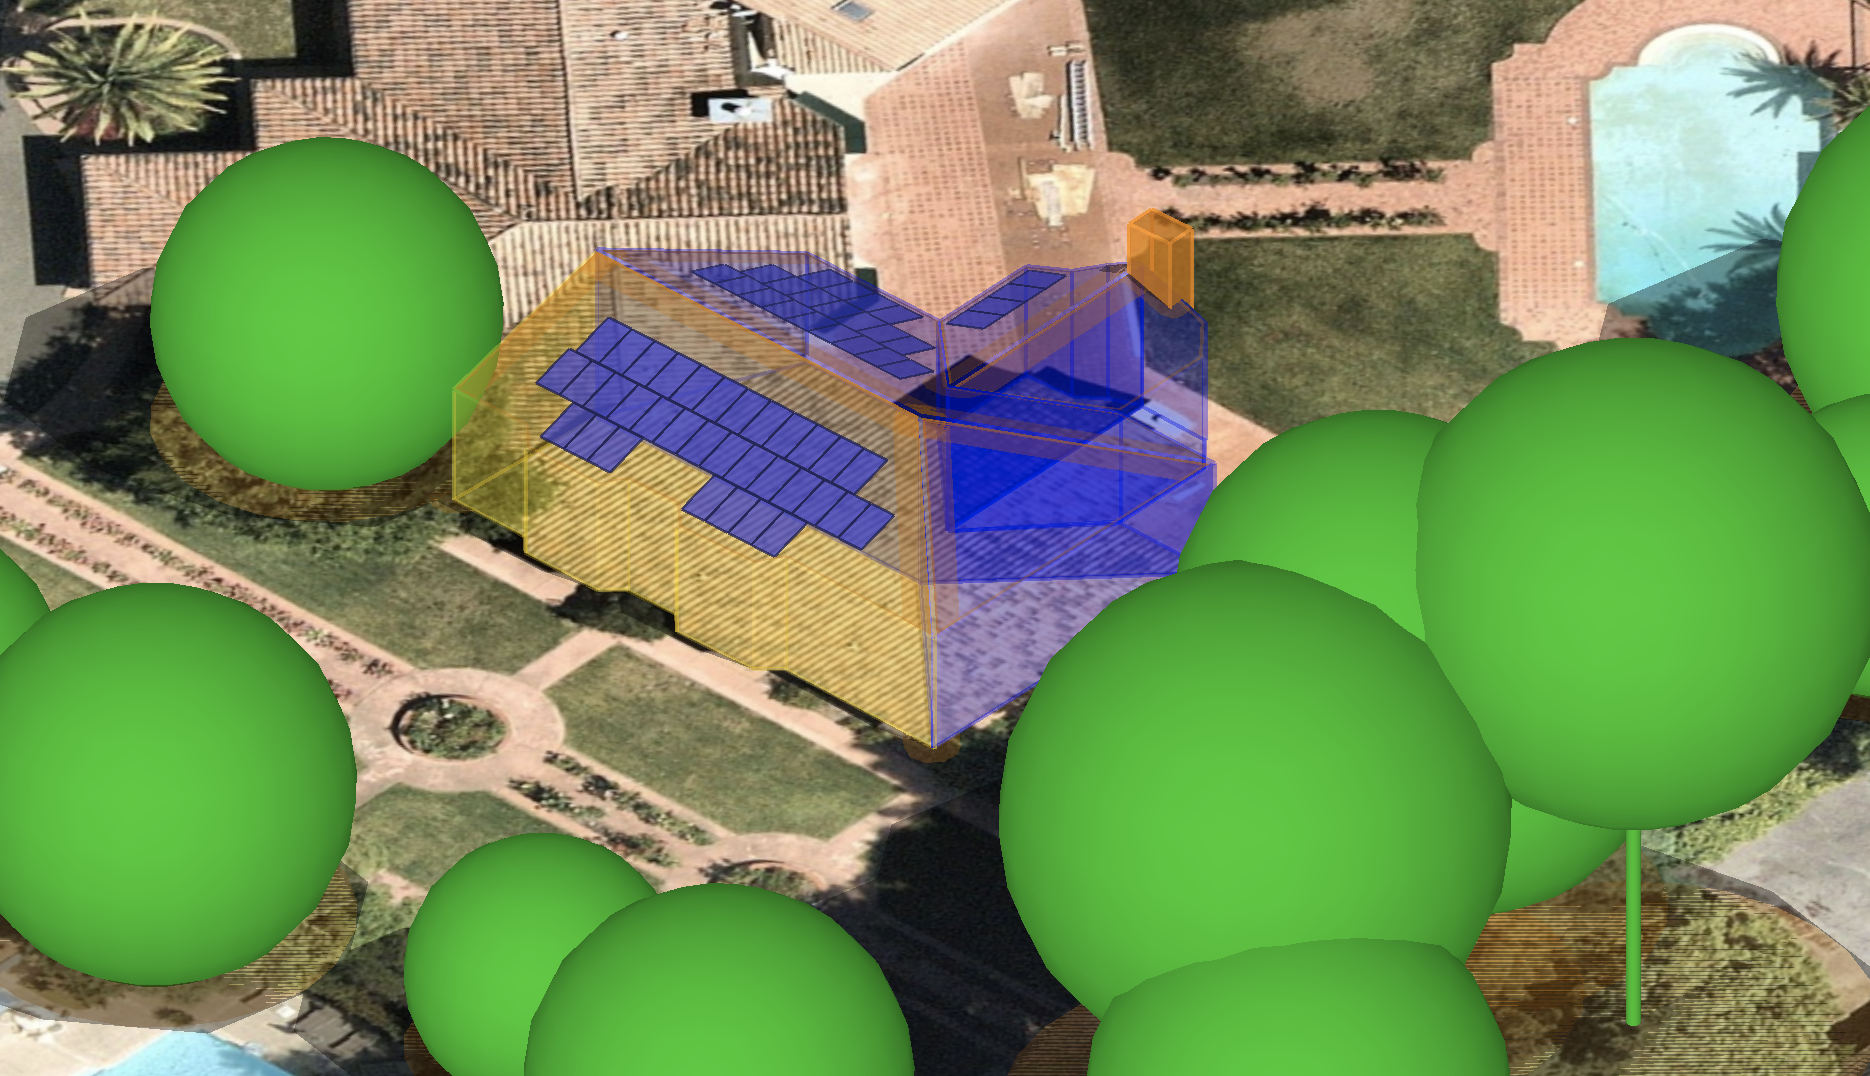
Shade Based Height Estimation
Why it matters: You can use the shade from a 2D image to get extremely accurate estimates of the height and tilt of your roof, as well as the height and shading effects of surrounding obstructions. This process has been validated by NREL to be the same quality analysis as LIDAR data or better in effectively all cases. This means you can use it for remote shade design in many states that require shading analysis (such as Oregon and New York) and submit our shading report for verification.
How to do it: Find an obstruction like a light-post or something else tall and thin and match the shade on the ground with the shade from the image by changing the date and time you see the shade in HelioScope. You can then use this to accurately design the rest of the site. Check out the full video on how to do Shade Based Hight Estimation here.

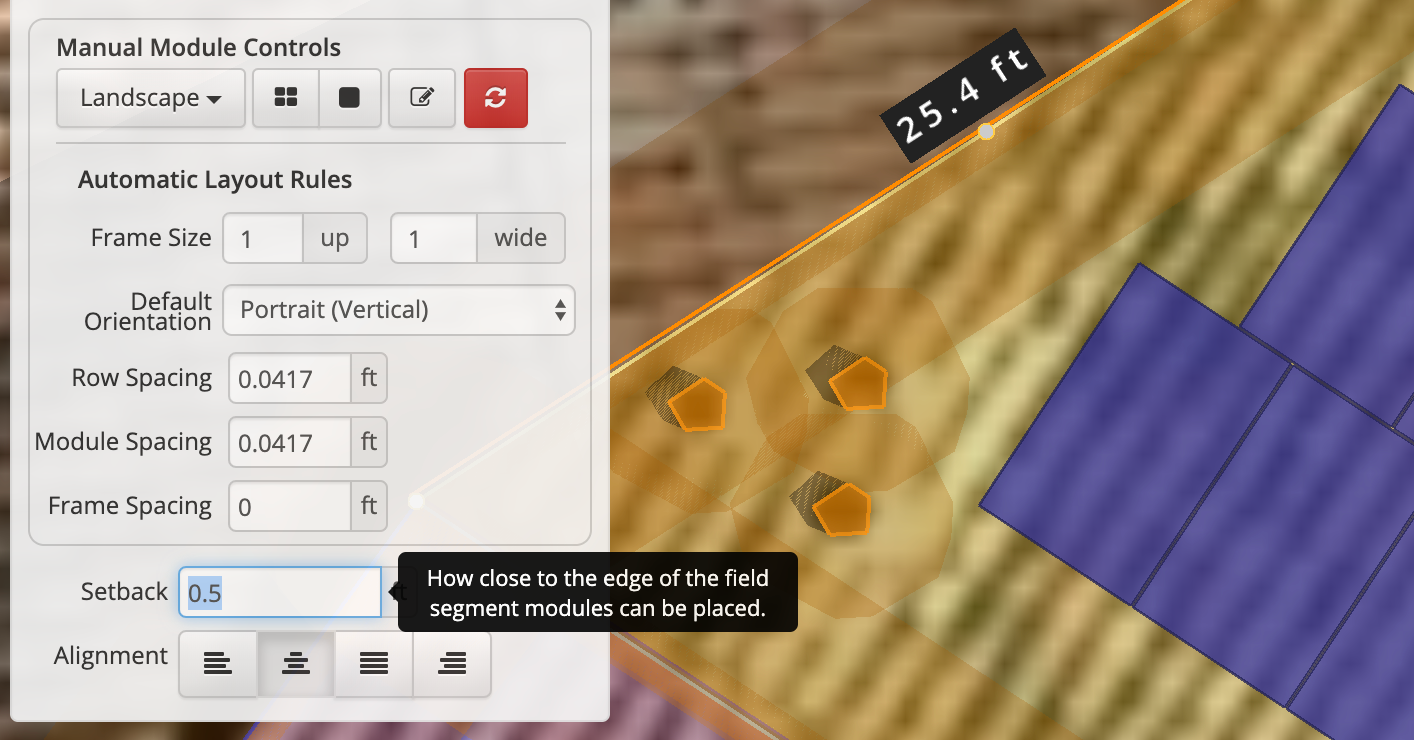
Conservative Design
Why it matters: When you're designing remotely, issues can come up for a number of reasons that could change the layout of your design. The imagery might not be high quality enough to catch those small vents on the roof, or the tilt of the rooftop may be slightly different than what you designed to. When I was doing commercial solar design, I was under a lot of pressure to pack as much onto a rooftop as I possibly could during the sales process, only to find out that we didn't actually have that much space. Instead of hoping this never happens, you can integrate conservative design tactics into your workflow to be more resilient to any problems.
How to do it: Start by considering what are your limits for design process, or for this particular project. Do you need to fit a certain number of modules on this roof to make the sale make sense? What potential changes could turn a profitable project sour? Some examples to avoid these situations are:
- Include a buffer setback on your roof edges. Not only does this give you extra space to work with if the roof tilt is a little bit different, it also lets you move around surprise obstructions.
- Include the small obstructions. Does that look like a pipe on the rooftop? Are you absolutely squeezing in an extra module next to the hip of one roof segment? Safer to include them and be happy when it turns out they aren't there (or that they can be ignored) rather than notice further into the sales process.
- Add the setbacks and obstructions in first. Don't work hard absolutely packing the rooftop with modules only to realize that your ideal layout has been ruined. Design what is absolutely going to be on the roof first, then make your additions.
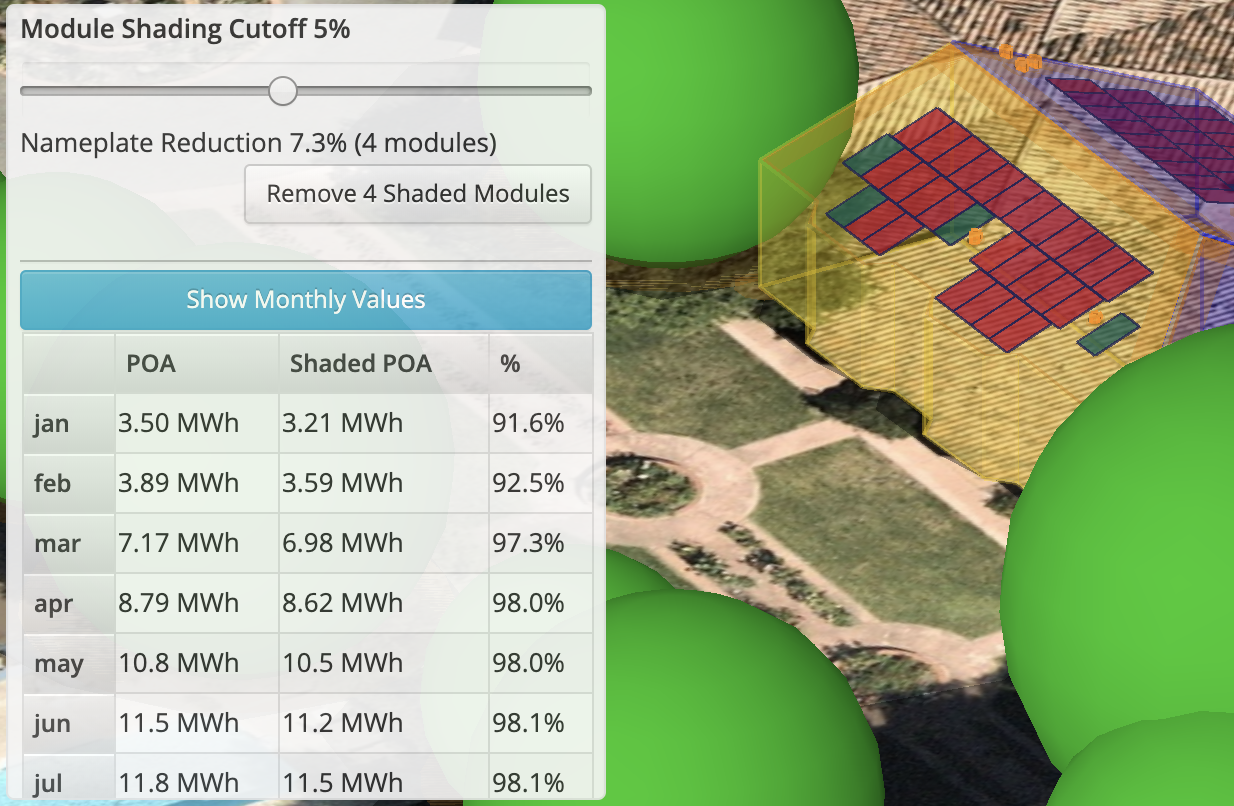
Shading Analysis
Why it matters: Besides the fact that you probably want to know how much shade is affecting your array, it's also important when submitting your projects for external shade validation. Solar designers used to design around shade by removing modules that would be shaded on the winter solstice, but with modern tools like HelioScope, you take a much more detailed look at how shading will affect your system
How to do it: Consider shading losses over the course of the entire year by using our advanced Shade Optimizer tool. This will let you analyze shade losses quickly and in fine detail so you only have to remove the modules you need to remove.
Production Guarantees
Why it matters: When designing a solar array, it's always important to have a good grasp on how much power that array will produce. However, weather is highly variable, and calculations from different sources can differ significantly. Banks and other financiers will often request a P90 (or some other Pxx value) to have a guarantee of production. You'll want to be confident in your production estimate in all cases, both for you, and for your customers.
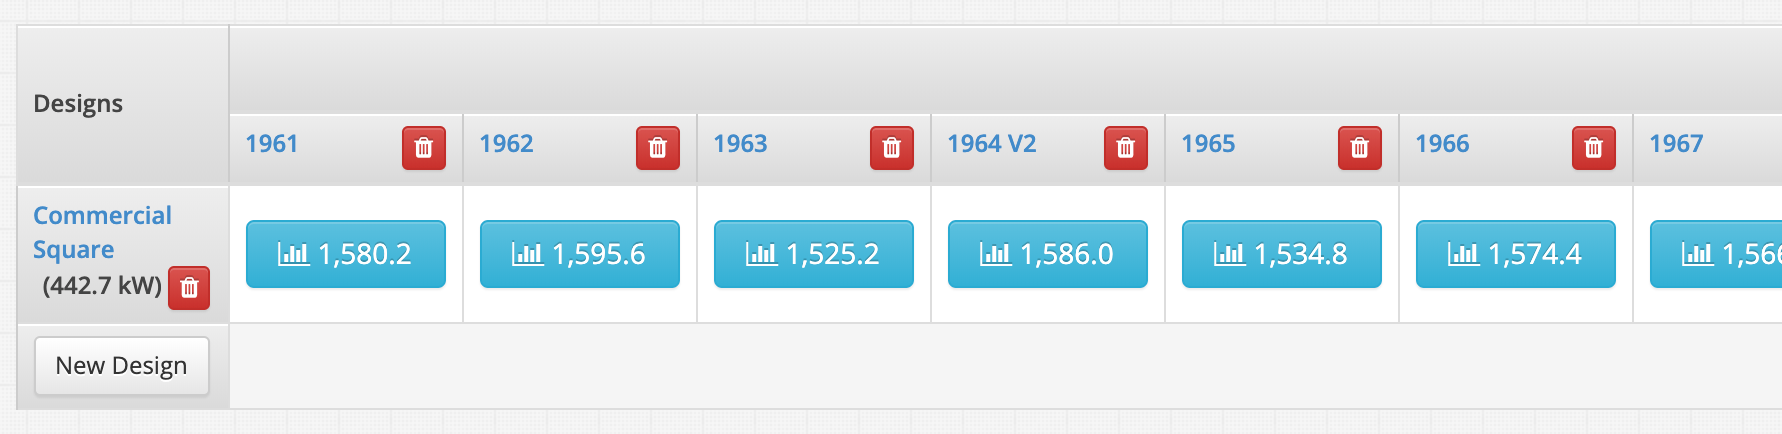
How to do it: Using the same weather file is always the most important factor when comparing between different simulation programs (for instance, HelioScope and PV Watts). There is enough variability between types of weather files that this can result in significant changes in production estimates. Try out a few weather files by simulating multiple Condition Sets to compare production.
If you need to truly get a P90 estimate of production, there are a few ways to do so. You can create your own using mutliple years of weather data if they're on hand. There are also weather companies like SolarGIS that sell P90 quality weather you can use in your simulations.
Using Templates for Design
Why it matters: While each new design may be a new puzzle to figure out, you're probably still using similar components for multiple designs. Whether you're using the same modules, inverters, setback rules or more, you can save yourself a significant amount of work by creating design templates to use up front. Start off with the things that will be the same between projects, and make the necessary changes from there rather than starting new every time.
How to do it: You can create multiple sets of design defaults called project profiles in HelioScope that affects your mechanical, electrical, and Condition Set designs. Create multiple profiles for different scenarios if need be. You can also favorite components so they automatically appear in the designer if you're only selecting between a few different modules or inverters.
The Webinar
If you missed the webinar, or would like to view the recording again, you can find that here: